Setting up Drupal as a GraphQL Backend for Gridsome or Gatsby
Serverless architectures are fast, cheap, and secure. Detaching the backend of a site opens the door to connect any CMS or data source that supports GraphQL. This tutorial looks at connecting and securing a detached Drupal instance as a data source for a Gridsome build. To save money for this cloud build the backend server will be shut down when not in use using some creative Lambda hooks
The Serverless Architecture for this tutorial:
- Gridsome for VueJS (or) Gatsby for React. Tutorial goes over connecting Gridsome but most the the connection settings are easily ported over to Gatsby.
- Drupal. A great CMS for larger serverless sites, with some planning and tweaking this can be incredibly cheap on AWS. For very small brochureware sites I'd recommend the free tier of a hosted CMS service like GraphCMS/Contentful but for more complex projects Drupal is a great fit.
- Amplify. Amplify is Amazon's equivalent of Google's Firebase. It's a library and toolkit that allows you to easily create an app in the cloud. We're only using it for it's deployment capabilities. For a low traffic serverless site it's dirt cheap and requires only a simple connection to the code repository.
- EC2. Deploying the Drupal backend on Ubuntu's latest LTS version with Apache 2.
- Lambda. Serverless functions. When doing something that needs a little backend processing or involves keys that can't be published publicly.
Drupal/Gridsome GraphQL Setup
Install and configure GraphQL.
The primary GraphQL project for Drupal has two versions. The newer version addresses some security issues by forcing you to design your schema. Version 3 will work for this tutorial since this is a fully detached website that will only call the Drupal backend at build, and has its GraphQL endpoints locked down we can use the old version. Add the older version to your Drupal project with composer.
composer require drupal/graphql:"^3.0"
To secure the GraphQL endpoint add Basic Authentication and configure the CORS
settings in Drupal's services.yml file.
Securing GraphQL: Lock down the GraphQL endpoint.
Because this is a static website the only access to the GraphQL endpoint should be from Gridsome at build time, so that endpoint should be locked down with Basic Authentication to password protect access to it.
Restrict access in Apache using the
<LocationMatch>
tag in the Virtual Host configuration, or if you're using Nginx use the
location
statement. It's very important to match the endpoint with a case insensitive
check to protect not only /graphql but variations like /GraphQL. LocationMatch
is case sensitive by default but you can use a regular expression to match any
casing by prepending (?i). Also change the default endpoint in
the module settings.
<VirtualHost *:80>
  <LocationMatch "(?i)/graphql">
    AuthUserFile /var/www/html/.htpasswd
    AuthName "Authorization Required"
    AuthType Basic
    require valid-user
  </LocationMatch>
</VirtualHost>
Securing GraphQL: Drupal CORS settings.
Drupal comes with a file for configuring web services connections. By default
it's inactive, to use it copy the template
from sites/default.services.yml to sites/services.yml.
Once the file is copied and active we can update the CORS settings to allow
VueJS/React to connect during build.
In the services file there's a section for CORS configuration, be default it should look like this:
cors.config:
  enabled: true
  # ...
  allowedMethods: ['*']
  # ...
  allowedOrigins: ['*']
  # ...
Make two changes, limit the allowed HTTP methods to POST, GET and OPTIONS and update the allowed origins.
cors.config:
  enabled: true
  # ...
  allowedMethods: ['GET', 'POST', 'OPTIONS']
  # ...
  allowedOrigins: ['http://localhost:8080', 'https://production.com']
  # ...
Connecting Gridsome to Drupal
Add the GraphQL source module to Gridsome.
npm install @gridsome/source-graphqlOnce GraphQL is installed configure it in the `gridsome.config.js` file.
  module.exports = {
  plugins: [
    use: '@gridsome/source-graphql',
    options: {
      url: 'https://drupalbackend.url/graphqlEndpoint,
      fieldName: 'drupal',
      typeName: 'drupalType',
    },
    headers: {
      Authorization: `Bearer ${process.env.AUTH_TOKEN}`,
    },
  ]
}
A couple of important things are happening in these configuration settings.
- The Basic Authentication "Authorization" header is being set. In the example here, the password is being set in the project
.envfile. The AUTH_TOKEN is the Basic Authentication password that was picked earlier in Base64. This header needs to be set for Gridsome to pull data down. - There's a quick way to get the Base64 password string, just open the Network tab of your browser dev tools, visit the endpoint in the browser, enter the credentials and pull the value from the request headers.
fieldNameis being set. When data is pulled down from the backend Gridsome will bring it in under this name so it doesn't conflict with local data.typeNameis being set. This will impact the GraphQL queries, it's added as a prefix to every data type. For example, a Drupal Article Node would bedrupalType_NodeArticle.
Server Management
Power down the server when not in use.
When a project's backend is completely detached and only required at build it means there is an opportunity to shut the server down to save money. Since AWS on-demand EC2 instances bill by the hour any time the server is off is going to be much cheaper than powered on, you're only paying for the data storage of the hard drive. When content updates/entry is sporadic this can save a ton.
Generally, I like to shut the server down on a schedule. For example, nightly at 8pm. That way if the server is spun up in the day and left on it will power down over night. From a security perspective powering the server off when not in use also provides some marginal additional protection from automated attacks.
If the server is going to be turned off nightly then there needs to be a way to turn it on for content entry. Creating a simple web endpoint with Lambda will provide a URL that will turn the server on, this can be bookmarked and easily shared with the content entry team.
Create an IAM role with enough access to the backend server on.
When creating an IAM user it's important to limit access to only what's needed. Since this script only needs to turn the backend server on, that's all it's going to have permission to do. IAM let's you create the permissions with a visual editor or by adding the JSON rule set directly. The only piece of information you need to make the rule is the EC2 instance ID. You can find this listed in EC2 Details tab when you select your instance in the EC2 Dashboard.
To start, create a new IAM role.

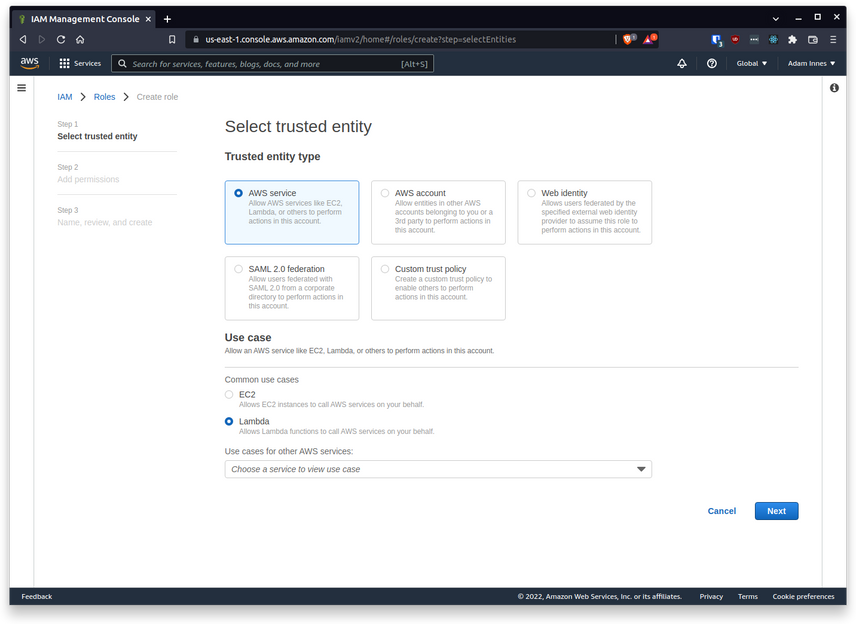
On the creation page keep "AWS service" as the Trusted entity type and select "Lambda" under "Common use cases". Hit Next and select the "Create Policy" option upper right.

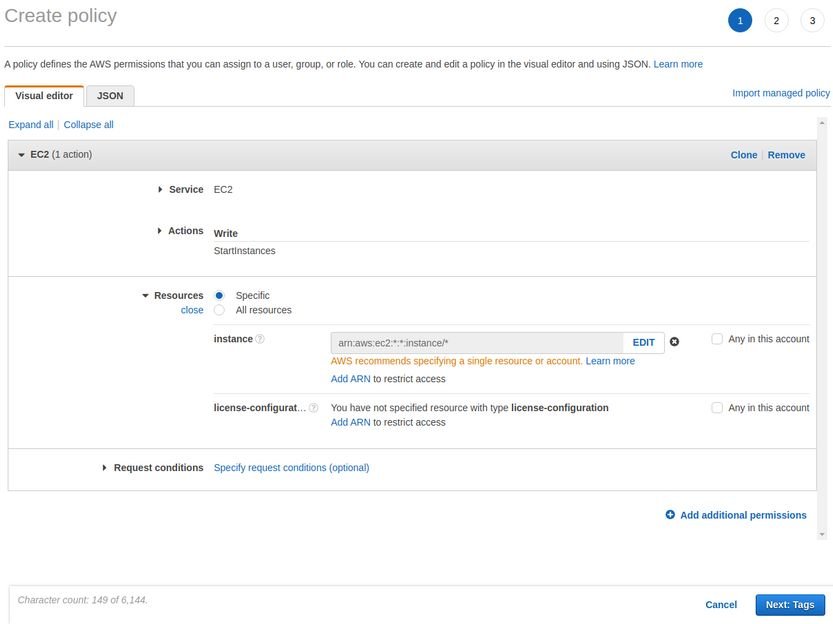
- Select "EC2" as the Service.
- Only enable what you need which in this case is the StartInstances permission under Write actions.
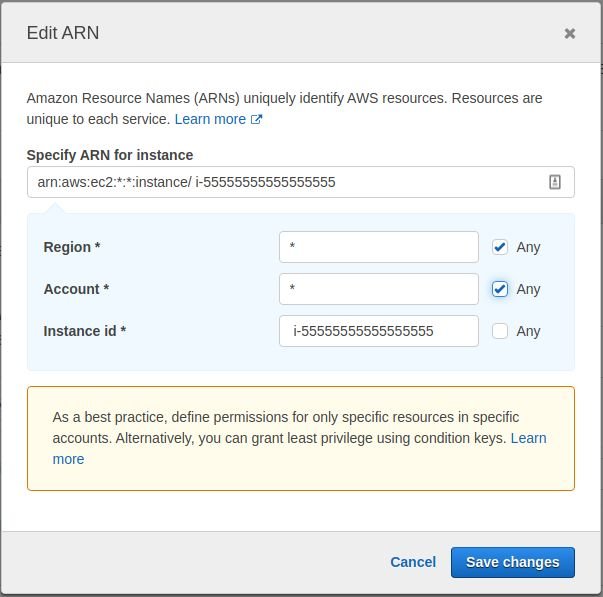
- Further limit these permissions by specifying the Instance ID in the resources section. This will limit the script to only turning on one server in the account. The current account number should pre-populate it. Select "all" for region and paste in the Instance ID from EC2.

Clicking the JSON tab should show permssions looking something like this..
{
    "Version": "2012-10-17",
    "Statement": [
        {
            "Sid": "PowerServerOn",
            "Effect": "Allow",
            "Action": "ec2:StartInstances",
            "Resource": "arn:aws:ec2:*:yourinstance:id/*"
        }
    ]
}
Big difference will be the correct resource ARN. Finish creating and naming the role.
Add the Lambda webhook to turn the server on.
A serverless Lambda function is the cheapest way to add a webhook. The AWS free tier covers millions of innvocations of a function so using it for something meant to be executed once a day is going to be essentially free.
Create a Lambda function for Node and attach the new role with StartInstances permissions.
const AWS = require('aws-sdk');

exports.handler = async (event, context) => {
  var ec2 = new AWS.EC2({ apiVersion: '2016-11-15' })

  var params = {
    InstanceIds: [
      process.env.INSTANCE_ID, // Set in the Lambda function configuration.
    ]
  };

  const response = await new Promise((resolve, reject) => {
    ec2.startInstances(params, function(err, data) {
      if (err) console.log(err, err.stack);
      else {
        resolve({
          statusCode: 200,
          headers: {
            "Content-type": "text/html"
          },
          body: waitingPage
        });
      }
    });
  });

  return response;
};
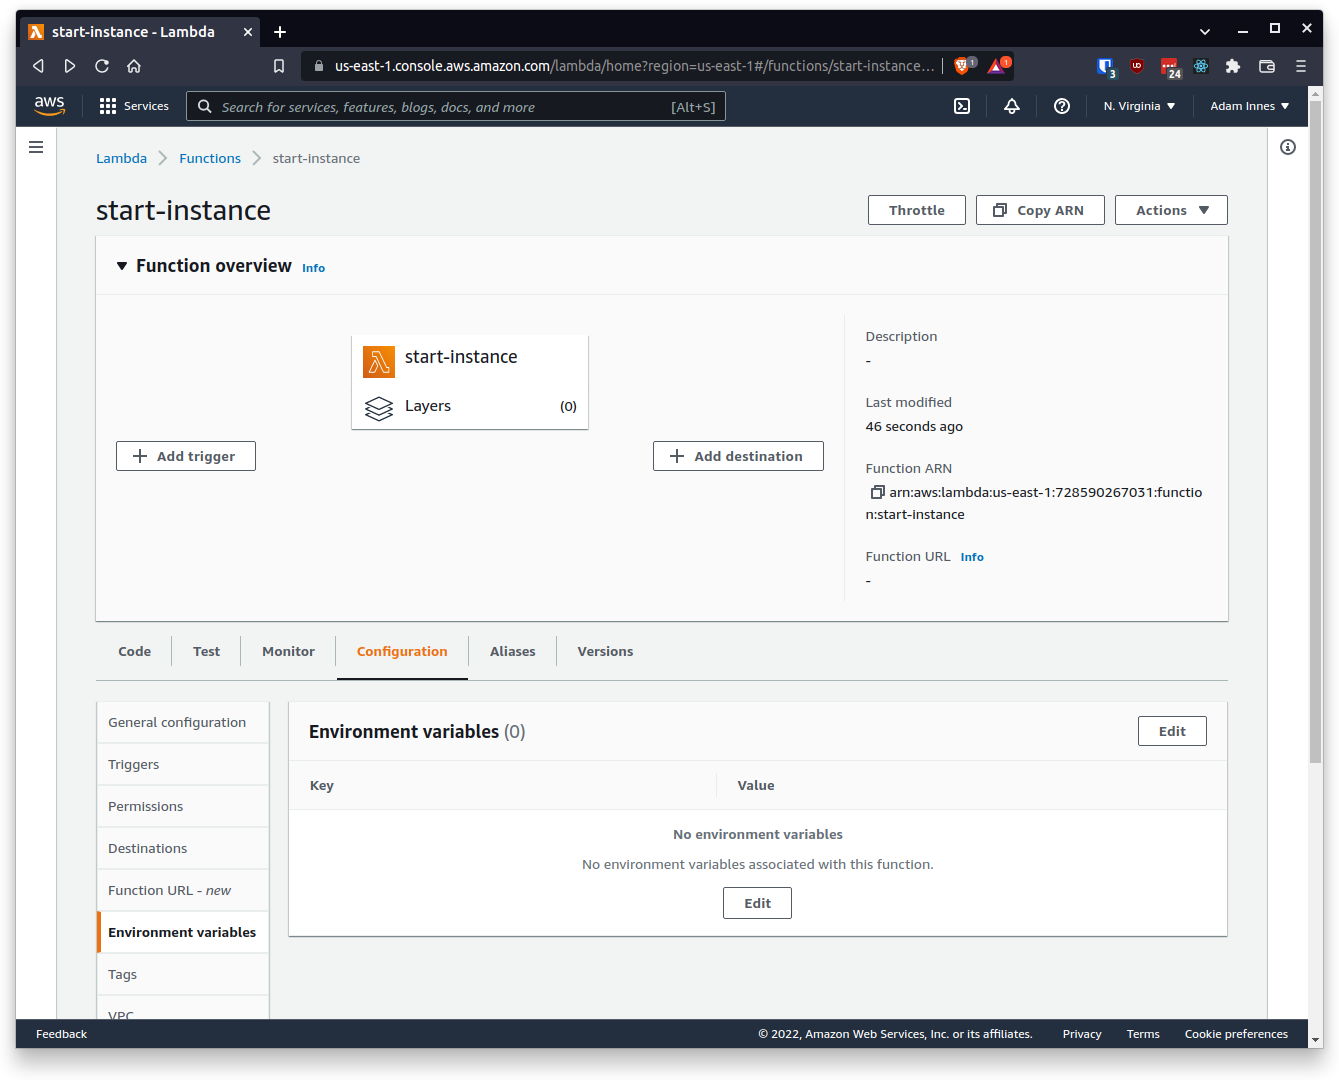
This script will turn an EC2 instance on if it has permission to. Add an environment variable in the lambda configuration settings. Lambda passes these in under the `process.env` variable. There's no need to install `dotenv`.

Add a single variable INSTANCE_ID with the id of the EC2 instance to restart. Under Actions (top left) publish a new version. Add an HTML endpoint as a trigger and it's ready to go.